Adding security headers in Hugo with Netlify and Report URI
Here’s how I added security headers to my Hugo site on Netlify with Report URI 🔒🤝
It’s nice to be safe on the web and know that the code running in your browser is only what was intended to run by the developer who made it. It is also nice to prevent others from injecting code to our site and hijacking software libraries that we use in an attempt to harm visitors.
Here’s how I set security headers to solve that exact problem in less than an hour.
I’ve worked with Content Security Policies in the past for some clients as a consultant but had not added it to my own blog so I decided to address it. To my surprise this has become even easier than ever before thanks to easy and free performance testing tools such as Web Page Test and Security Headers, a site by Scott Helme and sponsored by Report URI.
This morning I started by looking at my website performance on Web Page Test, a free service that runs up to 3 consecutive tests on any website for free.
This service gives a trove of valuable insight about how fast a website loads according to core browser response metrics such as first byte time, and it tells you which parts of the site load slower than the rest. This is incredibly useful on its own, but now they also feature a security score, and I had a D.
Not good. The performance benefits with an all star A rating didn’t feel nice when standing next to that D.
The good news is that going from D to A and even A+ is pretty fast if you can start setting headers on the code you currently permit on the site.
That is the biggest condition in this blogpost.
There is no bad news as I see it. Here are my steps if you want to do the same for your site. My guide is focused on using Hugo but generally speaking the steps are exactly same, only the configuration has to be placed elsewhere on Apache, Nginx and IIS.
You will need to
- set some basic security headers and
- start to log what would be a policy violation if you were running a Content Security policy
- review those logs and
- create a content security policy for your site
That’s it.
For the first part I chose a very strict set of security headers to prevent other sites loading mine as a frame.
X-Frame-Options: DENY
X-XSS-Protection: 1; mode=block
X-Content-Type-Options: nosniff
I’ll show you where to store this in your site configuration after our next step with CSP.
I used Report URI to generate my Content Security Policy and I highly recommend it for the ease of use and generous free quota they offer.
After signing up you need to verify your email. Then I recommend claiming your own subdomain to make logging and reviewing logs easier. I also recommend setting up 2 factor authentication for your account.
Then head to Setup and select your policy disposition as Report-Only.
Now here’s where things get specific for hosting your site with Netlify:
I chose to build my site with Hugo because I don’t want to spend time coding the site. I want to prioritise writing my blog posts and making them good enough for myself and readers. Since I deploy the site with Netlify I looked at their documentation for configuring deployment and found it somewhat adequate.
There are 2 options for setting headers in Netlify:
Using a _headers file or the netlify.toml configuration file. I started by using the first and quickly switched to the second.
Simply put, you are supposed to put the _headers file in your publishing directory, but this didn’t seem to work. I tried using the static folder and this didn’t work either. I suspect that is because each Hugo theme is different and Git doesn’t always find the file in commits so it’s not guaranteed to work.
Using the configuration file however worked right away so I highly recommend that. Netlify will always respect this file and it’s in my Github repository for the blog so I won’t lose this.
So what do you put in it?
This morning my file only contained the following
[build]
  publish = "public"
  command = "hugo"

[context.production.environment]
  HUGO_VERSION = "0.58.2"
  HUGO_ENV = "production"
  HUGO_ENABLEGITINFO = "true"
You can add content security policy and other security headers by creating an additional set of parameters native to Hugo using headers. Now we’ll add the basic headers from our previous step as well as some additional security feature policies.
[[headers]]
  for = "/*"
  [headers.values]
    X-Frame-Options = "DENY"
    X-XSS-Protection = "1; mode=block"
    X-Content-Type-Options = "nosniff"
    # Content-Security-Policy = ""
    # Content-Security-Policy-Report-Only = "default-src 'none'; form-action 'none'; frame-ancestors 'none'; report-uri https://yoursubdomainat.report-uri.com/r/d/csp/wizard"
    Referrer-Policy = "strict-origin-when-cross-origin"
    Strict-Transport-Security = "max-age=2592000"
    Feature-Policy = "vibrate 'none'; geolocation 'none'; midi 'none'; notifications 'none'; push 'none'; sync-xhr 'none'; microphone 'none'; camera 'none'; magnetometer 'none'; gyroscope 'none'; speaker 'none'; vibrate 'none'; fullscreen 'none'; payment 'none'"
We’ll review these at the end, but for now it is sufficient to say that we are reporting violations of our CSP in the browser and sending the violations to our account at Report URI.
This will not prevent the site from loading but the browser will now start to log all violations as if this were an active policy. The data is sent to our Report URI account. Simply replace the address for https://yoursubdomainat.report-uri.com/r/d/csp/wizard.
Now go back to Report URI > CSP > Wizard and behold all the permissions your current code will require for a valid policy.
If you want to tighten the policy to be more restrictive I can sympathise, but for now I suggest adding them all to your CSP and adding it to your site. This will improve security, and then you can revise what code should be allowed to run in a second revision. It’s easier to do this once you get a firm grasp on CSP arguments anyway.
To grab your policy, go to the menu option CSP > My policies and copy the proposed CSP.
This can now be added to your Netlify configuration file.
Mine became
[[headers]]
  for = "/*"
  [headers.values]
    X-Frame-Options = "DENY"
    X-XSS-Protection = "1; mode=block"
    X-Content-Type-Options = "nosniff"
    Content-Security-Policy = "connect-src api.amplitude.com; font-src cdnjs.cloudflare.com fonts.gstatic.com; img-src 'self' tobiasmcvey.com www.tobiasmcvey.com; script-src-elem 'unsafe-inline' cdn.amplitude.com cdnjs.cloudflare.com tobiasmcvey.com 'self'; style-src-attr 'unsafe-inline'; style-src-elem 'self' 'unsafe-inline' cdnjs.cloudflare.com fonts.googleapis.com tobiasmcvey.com www.tobiasmcvey.com"
    # Content-Security-Policy-Report-Only = "default-src 'none'; form-action 'none'; frame-ancestors 'none'; report-uri https://tobsobobso.report-uri.com/r/d/csp/wizard"
    Referrer-Policy = "strict-origin-when-cross-origin"
    Strict-Transport-Security = "max-age=2592000"
    Feature-Policy = "vibrate 'none'; geolocation 'none'; midi 'none'; notifications 'none'; push 'none'; sync-xhr 'none'; microphone 'none'; camera 'none'; magnetometer 'none'; gyroscope 'none'; speaker 'none'; vibrate 'none'; fullscreen 'none'; payment 'none'"
There we have it: Fully functioning security headers that only permit current code and scripts from running on the site, and prevent others from using the site maliciously.
Just in case this needs pointing out: I advise against copy-pasting other people’s CSP. It won’t protect your site.
I reran the web page test and got stellar results
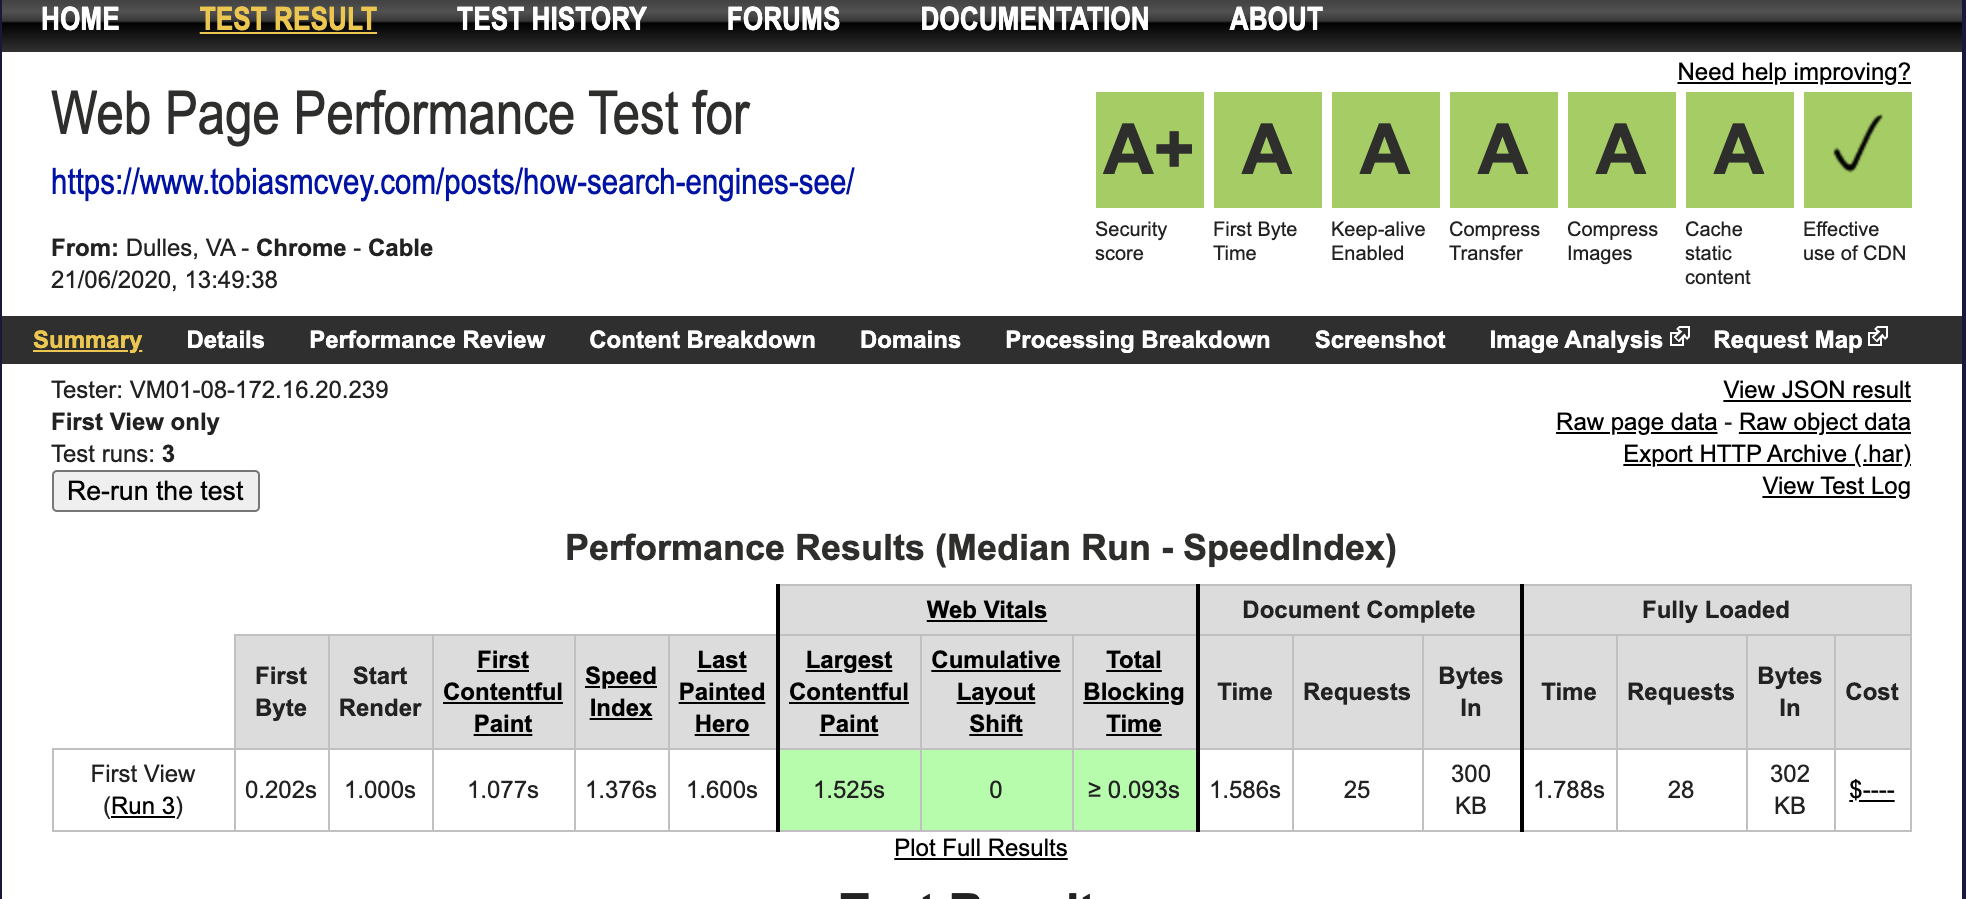
We got an A in all web performance categories and an A+ in our security score!
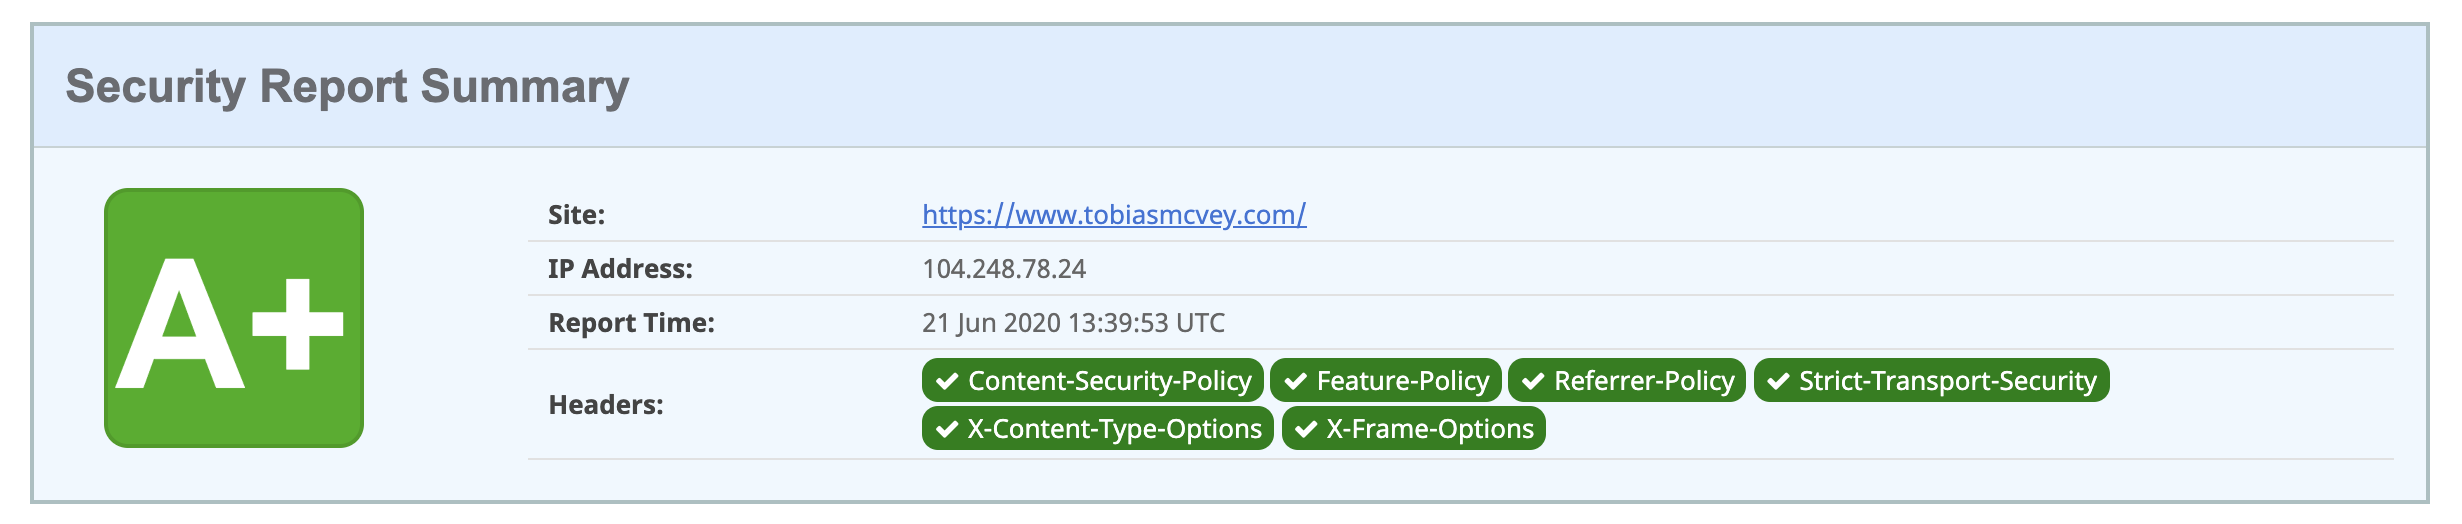
I also ran a test on Security Headers and got an A+ for
- Content-Security-Policy
- Feature-Policy
- Referrer-Policy
- Strict-Transport-Security
- X-Content-Type-Options
- X-Frame-Options
So what is each part of this policy doing?
X-Frame-Options prevents other people from loading our site in a frame. That is neat for a couple of reasons. For one, I don’t want people to copy my content or present my data on their site without permission. This also helps prevent click-jacking attacks.
X-XSS-Protection is the old defense against cross-site scripting attacks. It’s still worth keeping if you want to support older browsers.
X-Content-Type-Options is an instruction that the content-type of our page should not be transformed via sniffing.
Content-Security-Policy is a layer of security to prevent a number of attacks ranging from cross-site scripting attacks to data-injection attacks and more. Most modern browsers offer support for CSP, but for good measure we added the older XSS protection argument as well. Specifically we list which sources are to be trusted for our code and which levels of permissions we grant them to run code, and set terms for the code we permit to run inline. This is especially important if your site has a database attached. I don’t have this but if I did I would not run any inline code.
Feature-Policy is a setting for allowing and denying browsers features. There are many features that I have no intention of using on this site so they are just not allowed here.
EDIT 31 October 2020
Feature Policy has been renamed to Permissions Policy. MDN docs are not updated yet but you can read more about the changes on Scott Helme’s blog and on W3C.
Permissions Policy is a setting for allowing and denying browser features and APIs. I have chosen to disable all of them. The new name for the security header also uses a new syntax. In my case I had disabled all of them.
The Feature-Policy used to say
Feature-Policy: "vibrate 'none'; geolocation 'none'; midi 'none'; notifications 'none'; push 'none'; sync-xhr 'none'; microphone 'none'; camera 'none'; magnetometer 'none'; gyroscope 'none'; speaker 'none'; vibrate 'none'; fullscreen 'none'; payment 'none'"
Now the Permissions-Policy looks like this
Permissions-Policy: "vibrate=(), geolocation=(), midi=(), notifications=(), push=(), sync-xhr=(), microphone=(), camera=(), magnetometer=(), gyroscope=(), speaker=(), vibrate=(), fullscreen=(), payment=()"
So now we’re back on our sweet A+ grading on Security Headers. \o/